
How To Set Up A Candy Buffet
10/01/2013 13:40
How to set up a Candy Buffet
Candy Buffets are all the rage at the moment, and a big hit with the invited guests. You would not believe the amount of brides I have spoken to after their wedding that have told me all they wanted to do when they entered the Reception Room was head straight to the Candy Buffet Table for a look. They are however not just popular at Weddings but also at most types of celebrations including; Christenings, Birthdays and Corporate Events.
There are many things to consider before setting up a Candy Buffet yourself including; budget, theme, glassware, candy and decorations for your table. You may decide to go it alone, letting your creative juices flow or you may choose to employ the services of a reputable company such as Centre Piece Boutique - a Sydney based company which specialises in event decoration and Candy Buffets.
Probably the first and most important thing to consider is your budget as this will influence the kind of candy or lollies and decorations you will select. There are so many places you can buy candy from on the Internet so now your choice is endless. Having said that it is easy to get carried away, so be clear on how much you want to spend and stick to it. In your budget you need to include the amount per person. You would normally allow about 1/2 cup or 4 oz per person (depending on the size of your favour box). You need to also think about your candy selection (variety of 8-10), decorations to match your theme, table and linen, glassware for example apothecary jars and favour boxes.
Theming
The next thing to consider is your theme. Usually Wedding Candy Buffets are an elegant extension of the venue room and the palette is selected to create cohesion with the entire reception. For Christenings, baby showers, and first birthdays often the colours chosen are pink or blue with white, and then decorations are added to compliment the occasion including crosses, bunting, tissue pom poms and balloons. The candy selected is often chosen in the colour theme of the event.
Once you have worked out your budget and your theme it's time to get started. I will go through the requirements first and then the step to setting up and the finishing touches. I have included step by step photos and I will also put a link to my YouTube demonstration, as often people like to follow visuals.
Requirements
These are the basic requirements for your Buffet - Table (size and shape dependant on number of people and the size and layout of the room), floor length tablecloth, apothecary jars or other glassware, tongs and scoops are the basic requirements for your table.
Please note some people may not to use glassware, so some other suggestions include; a small buckets (available in a variety of colours), or if a rustic theme, you might use small wicker baskets.
Step 1 - Choose your table
Choose a table that will fit nicely in the room without overcrowding it. You can really use any shape table but I would say the rectangular table is the most popular. I have used a round table for setting up this particular Candy Buffet, as it was the perfect fit for the area and it was for a smaller amount of people.

Step 2 - Dress your table
You need to dress your table. For a more formal event I would suggest a clean, pressed, floor length tablecloth. If it is for a children's party you could use a themed tablecloth, but you would have a hard time finding a floor length one.

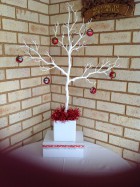
Step 3 - Add height to your table
Often people will choose to use a centrepiece for their table, themed to the occasion. To create balance and make your table appealing to the eye, it's a good idea to add some height to your table. There are numerous items you can use to create height including a gift box, I have just decorated it with ribbon around the top, but you could also wrap it in decorative paper, or lay satin fabric over the top. I have even used a chair cover to cover the box. You could also use items such as books, a suitcase or even a mirrored box.

Step 4 - Add your centrepiece
The table I was creating had a Christmas theme, so I used a white tree and decorated it with Christmas balls. The list is endless as to what you can usefor your centrepieces. If you are stuck for ideas please contact me and I can suggest many.
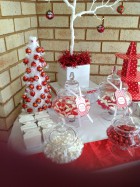
Step 5 - Add glassware and other items
Now it's time to start to put it all together. Start by placing the taller items at the back, positioning them to create balance and appeal to the eye. I was having pop cakes on this table, so as the stand was tall I placed that and the lolly tree either side of my centrepiece and the 2 large apothecary jars in between.
You will notice that I have dressed the 2 centre apothecary jars with ribbon and a tag. You can purchase ready made tags off places such as eBay, but there is also a huge selection of free tags available on the internet. These are just printed on normal paper, but you could use coloured paper, cardboard or even photo paper, depending on the look you are trying to create.
I just attached them with double sided tape, another suggestion is to use a scrapbooking pin to hold them together.

Step 6 - Continue building
Continue adding your apothecary jars till you have placed them all on the table.

Step 7 - Add colour if necessary
If you feel that your table needs something extra may I suggest a table runner to go under the glassware at the front. Obviously you would place the runner on first before adding the last of glassware.
Could I suggest that you set your table up at home before the big event so you know exactly how and where to place things and take a picture, this will save time and prevent stress on the day. You can always place your confectionary in zip lock bags to keep them fresh.

Step 8 – Add a bunting
Many people like the look of a bunting. I will show you some ideas for making quick and simple themed bunting in one of my upcoming demonstrations. You can also purchase them from a variety of shops, but why not make them personalised and incorporate your theme at the same time.

Step 9 - Add flavour boxes
You need something for your guests to put their lollies in, to take home or back to their table to eat. If there is enough room on your table, you may decide to set them up neatly to complete the look of the table. Or you may choose to have favours on the table, where guests are sitting and they can come up with them. Why not attach handmade gift tags with either a thank you, or the name of the person seated there to your boxes. It is a good way to cut costs and save time.
You can use many things to put your candy in such as paper or plastic noodle boxes, small glass jars and paper or cellophane bags. A suggestion if you are using the bags, you could place them on a small easel or even a small recipe book stand, that many of you probably have in your kitchen for show and blend it in with the table.
Step 10 - Add extras
Don't forget to add scoops and tongs so your guests aren't tempted to use their fingers (who knows where they have been), you want to implement safe food handling practices. I have also placed a round mirror tile with diamonds around the side under the middle jar. You may like to use multiple mirrors on the table.

So there you have a step-by-step guide to setting up a Candy Buffet. Hope some of my suggestions and tips are helpful. If you are stuck for ideas or just need some suggestions I would be happy to help.
Have fun and bring out your creative side.
View step-by-step on YouTube